The Intel® Boot Agent software provides configuration options that allow you to customize the behavior of the Intel Boot Agent software. You can configure the Intel Boot Agent in any of the following environments:
A pre-boot environment (before operating system is loaded)
The Intel Boot Agent supports PXE in pre-boot, Windows*, and DOS environments. In each of these environments, a single user interface allows you to configure PXE protocols on Fast Ethernet, Gigabit, and PXE on 10GbE adapters.
To enter the Intel Boot Agent setup menu, press and hold <Ctrl>-S during system start-up.
If you use Windows Vista or a more recent version of the Windows operating system on your client computer, you can use Intel® PROSet for Windows* Device Manager to configure and update the Intel Boot Agent software. Intel PROSet is available through the device manager. Intel PROSet provides a special tab, called the Boot Options tab, used for configuring and updating the Intel Boot Agent software.
To access the Boot Options tab:
Open Intel PROSet for Windows Device Manager by opening the System Control Panel. On the Hardware tab, click Device Manager.
Select the appropriate adapter and click the Boot Options tab. If the tab does not appear, update your network driver.
The Boot Options tab shows a list of current configuration parameters and their corresponding values. Corresponding configuration values appear for the selected setting in a drop-down box. A brief description of the setting’s function appears in the Description box below it. See Boot Agent Configuration Settings for a list of configuration parameters, their possible values, and detailed descriptions.
Select a setting you want to change from the Settings selection box.
Select a value for that setting from the Value drop-down list.
Repeat the preceding two steps to change any additional settings.
Once you have completed your changes, click Apply Changes to update the adapter with the new values.
Intel provides a utility, Intel® Ethernet Flash Firmware Utility (BootUtil) for installing and configuring the Intel Boot Agent using the DOS environment. BootUtil supports the Intel® PRO/100, Gigabit, and 10GbE family of adapters. See BootUtil for more information.
| NOTE: Intel Boot Agent may be disabled in the BIOS. |
You can customize the behavior of the Intel Boot Agent software through a pre-boot (operating system independent) configuration setup program contained within the adapter's flash ROM. You can access this pre-boot configuration setup program each time the client computer cycles through the boot process. The boot process is triggered whenever any of the following boot events occur:
Power on
Hard reset (Reset button on system, if available)
Soft reset (Ctrl+Alt+Del)
Operating system or application-initiated system restart
When the boot process begins, the screen clears and the computer begins its Power On Self Test (POST) sequence. Shortly after completion of the POST, the Intel Boot Agent software stored in flash ROM executes. The Intel Boot Agent then displays an initialization message, similar to the one below, indicating that it is active:
Initializing Intel(R) Boot Agent Version X.X.XX
PXE 2.0 Build 083
| NOTE: This display may be hidden by the manufacturer's splash screen. Consult your manufacturer's documentation for details. |
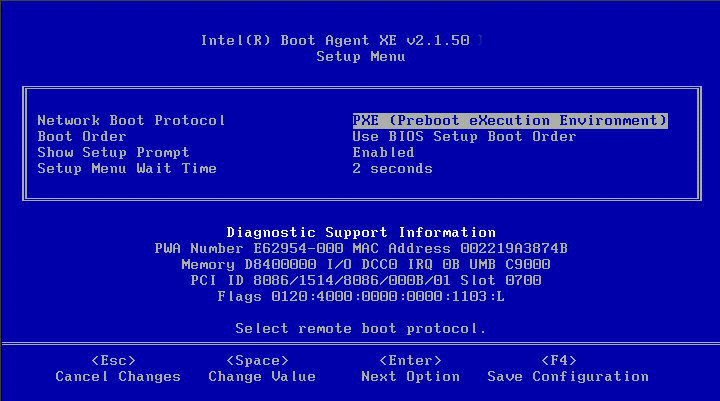
The configuration setup menu shows a list of configuration settings on the left and their corresponding values on the right. Key descriptions near the bottom of the menu indicate how to change values for the configuration settings. For each selected setting, a brief "mini-Help" description of its function appears just above the key descriptions.
Highlight the setting you need to change by using the arrow keys.
Once you have accessed the setting you want to change, press the spacebar until the desired value appears.
Once you have completed your changes, press F4 to update the adapter with the new values. Any changed configuration values are applied as the boot process resumes.
The table below provides a list of configuration settings, their possible values, and their detailed descriptions:
Configuration Setting |
Possible Values |
Description |
|---|---|---|
|
Network Boot Protocol |
PXE (Preboot eXecution Environment) |
Select PXE for use with network management programs, such as LANDesk* Management Suite. NOTE: Depending on the configuration of the Intel Boot Agent, this parameter may not be changeable. |
|
Boot Order |
Use BIOS Setup Boot Order Try network first, then local drives Try local drives first, then network Try network only Try local drives only |
Sets the boot order in which devices are selected during boot up if the computer does not have its own control method. If your client computer's BIOS supports the BIOS Boot Specification (BBS), or allows PnP-compliant selection of the boot order in the BIOS setup program, then this setting will always be Use BIOS Setup Boot Order and cannot be changed. In this case, refer to the BIOS setup manual specific to your client computer to set up boot options. If your client computer does not have a BBS- or PnP-compliant BIOS, you can select any one of the other possible values listed for this setting except for Use BIOS Setup Boot Order. |
|
Legacy OS Wakeup Support. (For 82559-based adapters only) |
0 = Disabled (Default Value) 1 = Enabled |
If set to 1, the Intel Boot Agent will enable PME in the adapter’s PCI configuration space during initialization. This allows remote wakeup under legacy operating systems that don’t normally support it. Note that enabling this makes the adapter technically non-compliant with the ACPI specification, which is why the default is disabled. |
NOTE:
If, during PXE boot, more than one adapter is installed in a computer and you
want to boot from the boot ROM located on a specific adapter, you can do so by removing
the adapter from the BIOS Boot Order or disabling the flash by running
BootUtil
      -FlashDisable
on the desired adapter.
|
While the configuration setup menu is displayed, diagnostics information is also displayed in the lower half of the screen. This information can be helpful during interaction with Intel Customer Support personnel or your IT team members. For more information about how to interpret the information displayed, refer to Diagnostics Information for Pre-boot PXE Environments.
Last modified on 4/24/13.