![]()
NOTE: DCB does not install in a VM. iSCSI over DCB is only supported in the base OS. An iscsi initiator running in a VM will not benefit from DCB ethernet enhancements.
iSCSI/DCB Installation & Configuration
Configuration for Intel® Ethernet iSCSI Boot
Installing Windows 2003 with Local Disk
Installing Windows 2003 without Local Disk
RIS Installation of Windows 2003
Installation of Windows Server 2008 from Media
For Windows Server 2003, Windows XP, and Windows 2000 the Microsoft iSCSI software initiator can be downloaded and installed. For Vista and Server 2008, it is included inbox. You will need to enable the iSCSI Initiator service, discover and configure both the initiator and the connection to the target. Please refer to the Microsoft* iSCSI Initiator User Guide for additional information.
This feature is only supported on 82599 and X540-based adapters, such as the Intel® Ethernet Server Adapter X520.
At the initial Intel Software installation screen, select the iSCSI/DCB checkbox. The installation process will install the relevant DCB service and the iSCSI/DCB application TLV.
From Windows Device Manager, expand Networking Adapters and highlight the appropriate adapter (such as Intel® Ethernet Server Adapter X520). Right click on the Intel adapter and select Properties.
In the Property Page, select the Data Center Tab.
Data Center Bridging features can be set at either the switch or the adapter. Unless there is a compelling reason not to, we recommend using the switch settings. By selecting switch settings, the iSCSI traffic class and the minimum bandwidth guarantees are defined by the DCB settings in the DCB capable switch. Essentially you can push the DCB settings for a single switch to a number of hosts rather than attempting to configure every host. To have the adapter define the traffic class and bandwidth, uncheck the switch settings and set the appropriate traffic (0-7) and the percentage of bandwidth that you wish to allocate for iSCSI traffic. The Data Center Tab provides feedback as to the DCB state, operational or non- operational, as well as providing additional details should it be non-operational. It is worth noting that DCB requires negotiation between the adapter and its link partner, typically a switch. If the switch is not DCB capable, the DCB handshake will fail but the iSCSI connection will not be lost.
iSCSI installation will include the installation of the iSCSI DCB Agent (iscsidcb.exe), which is a user mode service.
Hardware Support: iSCSI Over DCB is supported by all FCoE-capable adapters.
Software Support: Windows Server 2008 SP2, Windows Server 2008 SP2 (with Hyper-V Role), Windows Server 2008 R2, Windows Server 2008 R2 (with Hyper-V Role).
|
|
NOTE: DCB does not install in a VM. iSCSI over DCB is only supported in the base OS. An iscsi initiator running in a VM will not benefit from DCB ethernet enhancements. |
iSCSI Over DCB is configured from the Data Center tab of Intel® PROSet for Windows* Device Manager.
iSCSI bandwidth (after boot up) is configured through DCB, if DCB is installed.
When in local mode, the raising or lowering of FCoE or iSCSI bandwidth percentage will lower or raise the LAN bandwidth settings respectively.
FCoE/iSCSI cannot co-exist on the same user priority.
The Bandwidth percentages for LAN, FCOE (if installed) and iSCSI (if installed) must add up to 100%.
The Intel® iSCSI Agent is responsible for maintaining all packet filters for the purpose of priority tagging iSCSI traffic flowing over DCB-enabled adapters. The iSCSI Agent will create and maintain a traffic filter for an ANS Team if at least one member of the team has an "Operational" DCB status. However, if any adapter on the team does not have an “Operational” DCB status, the iSCSI Agent will log an error in the Windows Event Log for that adapter. These error messages are to notify the administrator of configuration issues that need to be addressed, but do not affect the tagging or flow of iSCSI traffic for that team, unless it explicitly states that the TC Filter has been removed.
Go here for more information about DCB.
Follow installation steps to install the Intel® Ethernet iSCSI Boot-capable adapters with Intel iSCSI Boot firmware support.
Create a disk target (LUN) on an available iSCSI target system. Configure this LUN to be accessible to the MAC address of the adapter of the host being booted.
Make sure the iSCSI initiator system starts the iSCSI Boot firmware. The firmware should be configured properly, be able to connect to iSCSI target, and detect the boot disk.
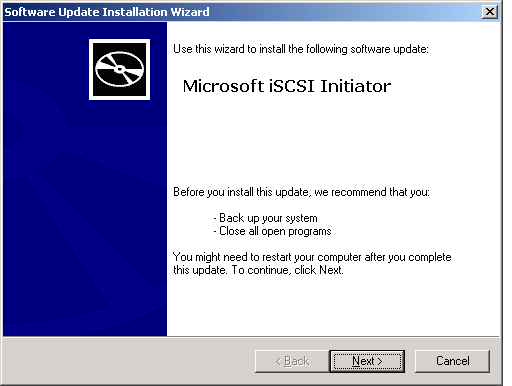
You will need Microsoft* iSCSI Software Initiator with integrated software boot support. This boot version of the initiator is available here.
To setup Windows Server* 2003 boot system when a local disk is available, follow the steps in installing Windows 2003 with Local Disk
To setup Windows Server 2003 boot system when a local disk is not available, follow the steps in installing Windows 2003 without Local Disk.
To perform a diskless install directly to an iSCSI target using RIS, follow the steps in RIS Installation of Windows 2003.
To setup Windows Server 2008 boot system, following the steps in Installing Windows 2008 from Microsoft Media.
To perform a diskless install directly to an iSCSI target using WDS, follow the steps in WDS Installation of Windows Server 2008.
To enable crash dump support, follow the steps in Crash Dump Support.
To upgrade or install network drivers, OS service packs or new hardware in Windows Server 2003, follow the steps in Upgrading/Installing Network Drivers, OS Service Packs, or New Hardware in Windows Server 2003.
For information on iSCSI Over DCB (Data Center Bridging), read iSCSI Over DCB.
If the local disk is not already connected, connect the hard drive temporarily to the system to be setup for diskless boot.
Create a disk target (LUN) on an available iSCSI target. Configure this LUN to be accessible to the MAC address of the NIC card of the host being booted.
Install Microsoft Windows 2003 SP1, SP1 R2, or SP2 Operating System on a temporarily connected local hard drive of the host system.
Install Network drivers for Intel Gigabit Network Adapters that are to be used for iSCSI Boot.
If you installed Windows 2003 SP1 or SP1 R2 then install the Microsoft Hotfix for Windows Server, KB902113 NDIS QFE. Windows 2003 SP2 contains the QFE.

Reboot the system.
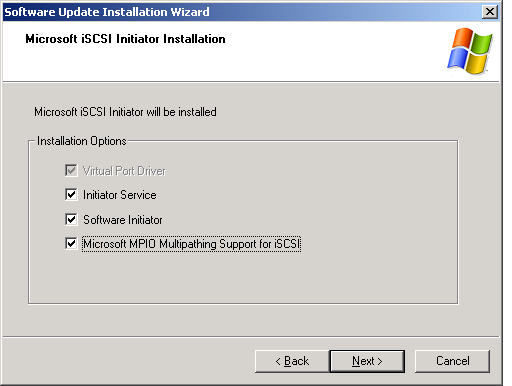
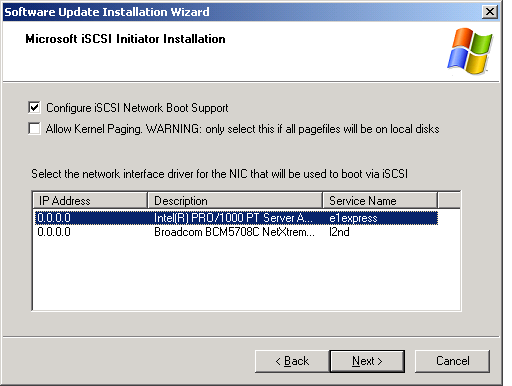
Install Microsoft iSCSI Software Initiator with integrated software boot support.
Select MPIO Multipath support when more then one network port is available for iSCSI Boot.
During installation when prompted select
an Intel Ethernet iSCSI Boot-capable Gigabit Network Adapter as a Boot Device. Check box to configure
iSCSI Boot. The Intel Gigabit Network Adapter is
identified as "e1express" during the installation.
Reboot and confirm the remote disk is accessible and configurable in Windows Disk Management.
|
|
NOTE: You don't need to configure Microsoft iSCSI Software Initiator for Windows to be able to detect the iSCSI Disk. Microsoft iSCSI Software Initiator automatically retrieves the iSCSI configurations from the Gigabit Network Adapter iSCSI Boot firmware. |
Use sysprep to prepare the OS Image for deployment.
|
|
NOTE: For more information on sysprep and image-based installations go here. |
Create a “sysprep” directory in the root of your system Drive.
Locate SUPPORT\TOOLS\DEPLOY.CAB archive on your Window 2003 CD, extract files, and copy all the files within the archive to the sysprep directory
Create the Sysprep.inf file using setupmgr.exe wizard and answer all the questions.
Edit the resulting sysprep.inf file by adding the LegacyNic=1 option in the
[Unattended] section, like so
[Unattended]
OemSkipEula=Yes
LegacyNic=1
Run Sysprep. Select "Reseal" and "shutdown" options for preparing an OS image.
Shut down the machine and capture OS image to a local disk partition.
Transfer image from local hard drive to iSCSI target.
Remove local hard drive or keep local hard drive for pagefile use. Configure the system BIOS to boot from iSCSI disk and boot it.
|
|
NOTE:
For more detailed information regarding image-based installations, see
the following white papers on the Microsoft TechNet web site:
|
;SetupMgrTag
[Unattended]
OemSkipEula=Yes
InstallFilesPath=C:\sysprep
LegacyNic=1
TargetPath=\WINDOWS
[GuiUnattended]
AdminPassword="password"
EncryptedAdminPassword=NO
AutoLogon=Yes
AutoLogonCount=1
OEMSkipRegional=1
OEMDuplicatorstring=2.02Boot
TimeZone=4
OemSkipWelcome=1
[UserData]
ProductKey=[my key here]
FullName="iSCSIBoot"
OrgName="Org"
ComputerName=*
[LicenseFilePrintData]
AutoMode=PerServer
AutoUsers=500
[TapiLocation]
CountryCode=1
Dialing=Tone
AreaCode=425
LongDistanceAccess="9"
[Identification]
JoinWorkgroup=WORKGROUP
[Networking]
InstallDefaultComponents=No
[Branding]
BrandIEUsingUnattended=Yes
[Proxy]
Proxy_Enable=0
Use_Same_Proxy=0
|
|
NOTE: An F6 installation requires two or more ports; either a multi-port adapter or two or more separate single port adapters. |
|
|
NOTE: To Install Windows 2003 x64 you must first create an Operating System installation media including a Hot Fix referenced from KB article #934848 at: http://support.microsoft.com/kb/934848/en-us. |
Copy iSSetup.sys, iSSetup.inf, iSSetup.cat and txtsetup.oem files from the Intel® Ethernet iSCSI Boot Media to a Floppy Disk.
Start the system and boot from the Windows Server 2003 Installation CD.
When prompted "Press F6 if you need to install a third party SCSI or RAID Driver..." Press F6.
WARNING: The option to press F6 is available at the very start of the OS Installation process and is easy to miss. You are only given three seconds to press F6. If you fail to Press F6 in time, restart the system and begin the OS installation again.
When prompted to install third party storage Device press <s> and select "Intel® iSCSI Setup Driver".
Press Enter and continue to complete the OS Installation.
Install Network Driver for Intel Gigabit Network Adapters. You must install the driver via Device Manager and not via SetupBD or the "Install Drivers and Software" button in Autorun which will use SetupBD.
|
|
NOTE: You will not be able to install the Network driver for the Network port that is being used by the iSSetup driver, so install the network Driver for other Network port. |
If you installed Windows 2003 SP1 or SP1 R2 then install the Microsoft Hotfix for Windows Server, KB902113 NDIS QFE. Windows 2003 SP2 contains the QFE.
Reboot the system.
Install Microsoft iSCSI Software Initiator with integrated software boot
support. Select MPIO Multipath
support when more than one network ports are available for iSCSI Boot. During installation when prompted select Intel®
Ethernet iSCSI Boot-capable Gigabit Network Adapter as a Boot Device. Intel Gigabit Adapter is
identified as "e1express" during the installation.
Reboot the system.
Confirm the remote disk is accessible and configurable in Windows Disk Management Computer Management. Note that you don't need to configure Microsoft iSCSI Software Initiator for Windows to be able to detect the iSCSI Disk. The Microsoft iSCSI Software Initiator automatically retrieves the iSCSI configurations from the Gigabit Network Adapter iSCSI Boot firmware.
Open the Microsoft iSCSI Software Initiator, go to the Target Tab and make sure it is loaded and connected to iSCSI target.
Run the iSCSIApp to uninstall the Intel® iSCSI Setup Driver.
|
|
NOTE: The Intel® iSCSI Setup Driver must be uninstalled before other drivers are installed. |
Reboot the system.
Install Network driver for the port that was being used by Intel® iSCSI Setup Driver.
Run iscsibcg.exe with /verify and /fix command line parameters.
|
|
NOTE: In the case of a Windows 2003 F6 installation with two different drivers running on Primary and Secondary, the user will need to re-install the Microsoft iSCSI Sortware Initiator rather than use iscsibcg, in order to bind the primary adapter to the MS Initiator. Otherwise the system will continue to boot via the Secondary port only. |
System is now ready for Windows iSCSI Boot.
In order to do a diskless install directly to an iSCSI target using RIS, a minimum of three network ports are required: one port for PXE; and 2 ports for iSCSI. The user will need to modify their RIS image according to the MS TechNet article Adding Text Mode Drivers to a RIS Image. From that point the user can follow the instructions for the standard F6 installation.
Install an adapter flashed with Intel® Boot Agent, or configure the LOM in your system to enable PXE.
Install an adapter flashed with the iSCSI Boot option rom.
Boot the machine.
Enter the BIOS and set the PXE adapter as the primary boot device.
Reboot the machine.
Enter the iSCSI Setup screen via CTRL-D, and enable the primary and secondary ports. Enter any static settings if you are not using DHCP. For more information on options in the iSCSI Setup screen click here.
NOTE: If the user want to strictly use DHCP, you will need to enable Option 60 for PXE, as well as options 12 and option 17 for iSCSI in the DHCP server.
Reboot the machine.
Ensure that the iSCSI option rom connects to the target, and the PXE option rom connects to your RIS server.
Locate the files required for a standard F6 floppy:
Copy and modify these files on your RIS server as directed by the MS TechNet article Adding Text Mode Drivers to a RIS Image.
Boot the system via PXE to your RIS server, ensuring that the iSCSI option rom has made a connection to the target.
Choose the Windows 2003 image you have modified with the F6 driver.
During textmode setup, Windows should find the target LUN and allow the standard partitioning options.
NOTE: These settings may be automated by your RIS server.
Continue the installation from this point as if it was a regular F6 installation.
NOTE: The F6 driver will skip the PXE enabled port, and bind to the Primary iSCSI port. This will allow the connection to the target during Windows Setup. Once setup has completed, the user should follow the usual process for installing NDIS and the iSCSI initiator, then uninstall the F6 driver.
|
|
NOTE: Windows Server* 2008 natively supports OS installation to an iSCSI target without a local disk and also natively supports OS iSCSI boot. |
Start installing Windows Server* 2008.
Select an iSCSI LUN on the “Where do you want to install Windows?” screen. Windows Server* 2008 installation media supports the network controller by default. Continue to complete the OS Installation.
If no iSCSI LUN is listed on the “Where do you want to install Windows?” screen, click “Load Driver” to install the network drivers for the network controllers. The network drivers are located on the Intel Network Driver CD or can be downloaded at http://www.intel.com/support/network/sb/CS-006120.htm to USB media. If an iSCSI LUN is listed, continue to complete the OS Installation.
For 10 gigabit network controllers only: If after performing step 3 above you don’t see the iSCSI LUN, then proceed with the following from the driver selection window:
Press shift+F10 to bring up the Windows PE command line.
Enter “drvload <path>” where <path> is the path to the WinPE inf.
Close the driver selection window by clicking x mark on the upper right side of the window. It automatically restarts from the initial installation screen with the network driver installed. Continue to complete the OS Installation.
Microsoft provides WDS, Windows Deployment Services, for acquiring installation image remotely. One network adapter is assigned for PXE Option ROM in order to pull the install image, and another adapter to iSCSI Option ROM for Windows Server* 2008 installation destination. The user may need to prepare a custom boot image based on the MS TechNet article Windows Deployment Services. A key difference from Windows Server* 2003 is that Windows PE is used for the Windows Server* 2008 installation process.
Prepare the WDS environment and the custom boot image based on the MS TechNet article.
For 1 gigabit network adapters and 10 gigabit retail adapters, inject the network driver and INF from PROXGB\Win32\NDISxx (or PROXGB\Winx64\NDISxx) directory to the custom boot image.
|
|
NOTE:
NDISxx indicates the NDIS version: Windows Server* 2008
SP1 or SP2 uses NDIS61; and Windows Server* 2008 R2 uses NDIS62. |
Install an adapter flashed with Intel® Boot Agent, or configure the LOM in your system to enable PXE.
Install an adapter flashed with the iSCSI Option ROM.
Boot the system.
Enter the BIOS setup menu and set the PXE
adapter as the primary boot device.
Reboot the system.
Enter the iSCSI Setup screen via CTRL-D, and enable the primary port. Enable the Secondary port if required by your configuration. Enter any static settings if you are not using DHCP. For more information on options in the iSCSI Setup screen click here.
|
|
NOTE:
If the user wants to strictly use DHCP, you will need to
enable Option 60 for PXE, as well as options 12 and option 17
for iSCSI in the DHCP server.
|
Reboot the machine.
Ensure that the iSCSI Option ROM connects to the iSCSI LUN, and the PXE Option ROM connects to the WDS server.
Boot the system via PXE to your WDS
Server, ensuring that the iSCSI Option ROM has made a
connection to your target.
Inject the other INF
discussed in Step 2 of the Setting UP WDS
section above into your custom boot image on
your WDS server. Reboot, and attempt the
install again.
OR
Manually load the network drivers:
For 10 gigabit network
controllers only: If after performing step 1
above you don’t see the iSCSI LUN, then
proceed with the following:
Create a temporary directory (for example, F:\temp\winpe on the USB media).
Copy all files from the PROXGB\Win32\NDISxx (or PROXGB\Winx64\NDISxx) directory to the temporary directory. NDISxx indicates the NDIS version: Windows Server 2008 SP1 or SP2 uses NDIS61; and Windows Server 2008 R2 uses NDIS62. Do NOT copy the INF files from NDISxx directory to the temporary directory.
Extract the .INF files from PROXGB\Win32\NDISxx\WinPE\*.zip to the temporary directory.
Crash dump file generation is supported for iSCSI-booted Windows 2003 x86/x64 by the Intel iSCSI Crash Dump Driver. A hotfix is available that adds support for crash dump file generation on a Windows Server 2003-based computer using Microsoft iSCSI Boot Initiator 2.05 at: http://support.microsoft.com/default.aspx?scid=kb;EN-US;939875
To setup crash dump support follow these steps:
Setup Windows iSCSI Boot as described in earlier documentation.
Install the Microsoft hotfix, KB939875.
Install Intel PROSet for Windows Device Manager by Autorun from the Intel Network Driver CD.
Run iscsibcg.exe with /verify and /fix command line parameters.
Open Intel PROSet for Windows Device Manager and select the Boot Options Tab.
From Settings select iSCSI Boot Crash Dump and the Value Enabled and click OK.
Crash dump file generation is supported for iSCSI-booted Windows 2008 x86/x64 by the Intel iSCSI Crash Dump Driver. A hotfix is available for crash dump file generation using Intel 10 gigabit Ethernet at:
http://support.microsoft.com/kb/970312
|
|
NOTE: This hot fix is not necessary for Intel 1 gigabit Ethernet. |
To setup crash dump support follow these steps:
Setup Windows iSCSI Boot as described in earlier documentation.
If you have not already done so, install Intel PROSet for Windows Device Manager by Autorun from the Intel Network Driver CD.
Open Intel PROSet for Windows Device Manager and select the Boot Options Tab.
From Settings select iSCSI Boot Crash Dump and the Value Enabled and click OK.
Run gpedit.msc. This will start the group policy editor; in this utility:
Expand "Computer Configuration"
Expand "Windows Settings"
Expand or select "Scripts(startup/shutdown)"
Double click "Shutdown"
This will open a Shutdown Properties dialog; click the Add button and add this executable or a batch file to run this.
Last modified on 8/16/11 12:57p Revision